

Written by: Rebecca Clark
Illustrated by: Sabine Deviche
Illustrated by: Sabine Deviche
Materials
- Two clear plastic CD cases, standard width
- Sieve for soil
- Dry soil, ideally from place where ants were collected (approximately 3 cups before sifting)
- Container for sifted soil (approximately ½ cup after sifting)
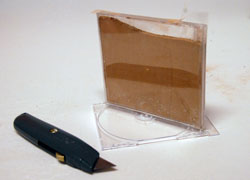
- Utility knife or other sharp knife that can cut plastic
- Clear packing tape
- Spoon
- Eyedropper (for watering soil)
- Straightedge for scoring and cutting plastic
- Marker to note exit/entry point location
- Two pieces of dark construction paper, or aluminum foil to cover sides of farm
This project requires adult supervision for cutting plastic.
Video Tutorial


Step by Step Instructions
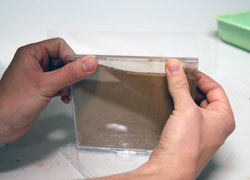
1. Empty CD cases
Remove interior plastic pieces from both CD cases. One interior plastic piece will serve as the farm’s base, while only part of the other piece is needed to seal the top of the farm. Set aside both pieces for the moment.
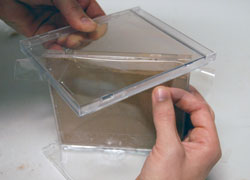
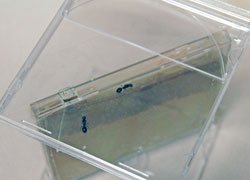
2. Cut holes for passage between top and bottom of farm
Position the two empty CD cases so that the case that will form the upper part of the ant farm is sitting flat on top of and perpendicular to the CD case that will hold the lower dirt portion of the farm, with the front side of the top case facing upwards so that it is easy to open and close. The top and bottom edges of CD cases contain two small openings each, and you will use one of those slits on top of the lower dirt CD to make an exit/entry point for the ants.
|
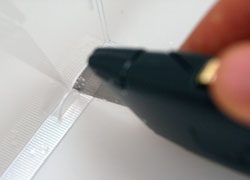
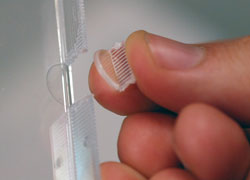
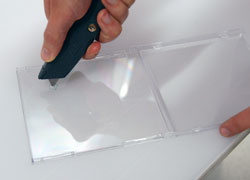
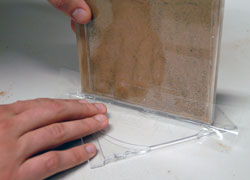
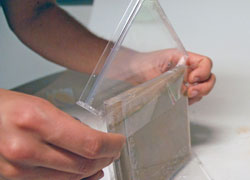
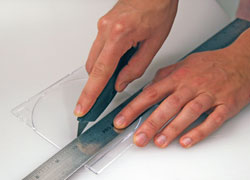
Enlarge one of the slits on the lower dirt CD case: score the edges of the slit on both sides of the case until you are able to snap off enough plastic to create a square hole. The final hole should be as wide as the edge of the CD case. |
 |
 |
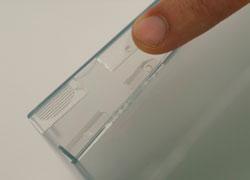 |
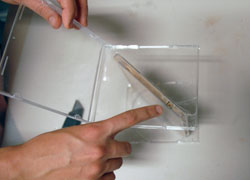
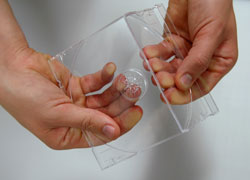
Mark the corresponding location on the underside of the upper CD case, where you will carve a small, circular hole using a utility knife or other sharp blade. The plastic may crack if you carve too quickly, so work gradually and avoid applying too much pressure.
 |
 |
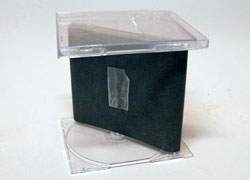
3. Construct a cover for the ant farm.
|
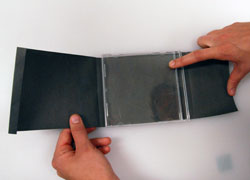
Ants tend to prefer dark locations. Tape together two pieces of construction paper lengthwise or use a sheet of aluminum foil to create a long rectangle that is the same height as one CD case and that is long enough to wrap around the entire lower case with several inches of overlap. |
 |
4. Seal holes and fill lower CD case with soil
|
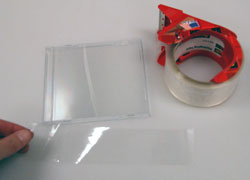
A. Seal Holes: To fill the lower CD case with soil, all small holes must first be sealed with tape. Use long strips of packing tape to close and seal the bottom edge and the side opposite the hinge, but leave the half-inch gap along the case’s spine open so you can add soil through the gap. Place a small piece of temporary tape over the top edge to cover the entry/exit hole. |
 |
|
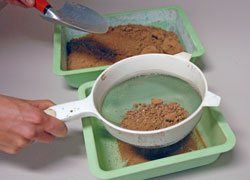
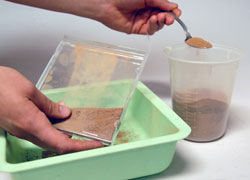
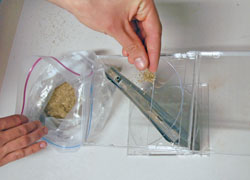
B. Sift soil: Before adding soil to the farm, sift dried soil to remove clumps and debris. You will need approximately ½ cup of sifted soil. |
 |
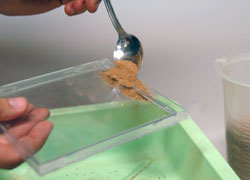
C. Fill CD case: Use a spoon to add soil into the CD case through the half-inch gap along the case’s spine, periodically pausing to tap the CD case to get soil to settle and compact. Try to fill the case with as much soil as possible.
 |
 |
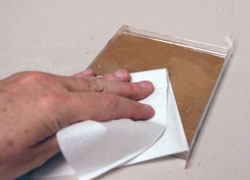
D. Clean off any dust that is on the outside of the case, and then use a long strip of packing tape to seal the open edge along the spine.
 |
 |
5. Assemble the farm
|
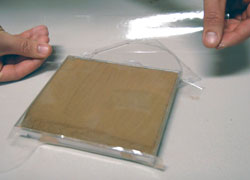
A. Attach CD case filled with soil to base: Locate one of the square pieces of plastic that came from the interior of one of the CD cases. Use a strip of packing tape along one bottom edge of the CD case filled with soil to attach it to the base piece. |
 |
|
Make sure that the top edge with the entry/exit hole faces upwards. A careful taping job will ensure that the ant farm will remain upright. Lay the CD case filled with soil flat on its side to attach a second strip of packing tape along the second side of the bottom edge of the CD case. |
 |
|
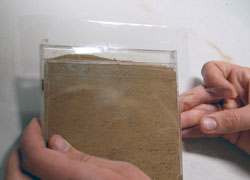
Once the second side is attached, the CD case filled with soil should be able to remain upright on its own. |
 |
|
B. Remove the temporary piece of tape that is covering the entry hole. |
 |
|
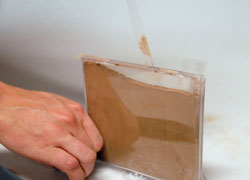
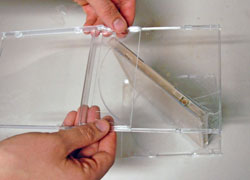
C. Attach the upper CD case to the lower CD case filled with soil. First, apply a strip of tape along the length of one of the sides of the CD filled with soil, leaving about half of the tape sticking up above the top of the CD. |
 |
|
Fold the tape down, and reposition the upper CD case so its entry/exit hole lines up with the hole in the lower CD case. Once the CD cases are properly lined, up, let the tape adhere to the upper CD case. |
 |
|
Then, tilt back the upper CD case, and apply a second piece of tape to the other side of the lower CD case, and tape the upper CD case securely in place |
 |
|
Check to make sure that the hole in the upper CD case lines up with the hole in the lower CD case. |
 |
6. Seal all holes on the upper CD case.
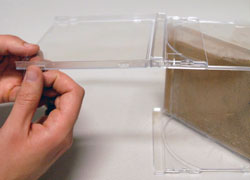
A. Locate the second plastic piece that formed the interior of the CD case. This piece will seal the half-inch hole along the spine on the top of the farm. Cut the interior plastic piece parallel to and 1.5 inches from the edge that is usually located next to the hinge of the CD case.
 |
 |
|
Snap this interior plastic piece into two pieces, and then fit the side that contains part of the CD case’s spine back into the CD case to seal the edge. |
 |
|
B. Use several small pieces of tape to cover the small holes on the edges of the top CD case. |
 |
7. Add water and ants to the farm
|
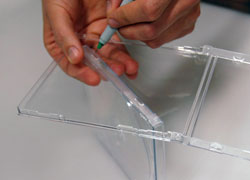
A. Use an eyedropper or similar device to add approximately 2 tablespoons of water to the ant farm through the farm’s entry hole. This water will soak down through the rest of the ant farm to provide enough moisture for the ants. |
 |
|
B. Add ants into the top CD case, and close the lid, being careful to avoid crushing the ants. It may take the ants a little while to find the entry hole. |
 |
|
C. Wrap the construction paper or aluminum foil cover around the soil portion of the ant farm when you are not trying to view the ants. |
 |
|
D. To feed the ants, open the top CD case and place food on the surface inside. If there are a lot of ants that could attempt to escape, place the ant farm in the refrigerator for 5 minutes to slow them down before opening the case to feed them. |
 |
E. Keep your ant farm somewhere moderately warm, but out of direct sunlight (e.g. on top of refrigerator, on desk under a warm lamp).
Read more about: Build an Ant Farm
You may need to edit author's name to meet the style formats, which are in most cases "Last name, First name."
https://askabiologist.asu.edu/how/building-ant-farm
Bibliographic details:
- Article: Build an Ant Farm
- Author(s): Rebecca Clark
- Publisher: Arizona State University School of Life Sciences Ask A Biologist
- Site name: ASU - Ask A Biologist
- Date published: 2 Nov, 2009
- Date accessed:
- Link: https://askabiologist.asu.edu/how/building-ant-farm
APA Style
Rebecca Clark. (Mon, 11/02/2009 - 18:53). Build an Ant Farm. ASU - Ask A Biologist. Retrieved from https://askabiologist.asu.edu/how/building-ant-farm
American Psychological Association. For more info, see http://owl.english.purdue.edu/owl/resource/560/10/
Chicago Manual of Style
Rebecca Clark. "Build an Ant Farm". ASU - Ask A Biologist. 02 Nov 2009. https://askabiologist.asu.edu/how/building-ant-farm
Rebecca Clark. "Build an Ant Farm". ASU - Ask A Biologist. 02 Nov 2009. ASU - Ask A Biologist, Web. https://askabiologist.asu.edu/how/building-ant-farm
For more info, see http://owl.english.purdue.edu/owl/resource/717/04/
MLA 2017 Style
Modern Language Association, 7th Ed. For more info, see http://owl.english.purdue.edu/owl/resource/747/08/

Learn about the lives of ants and how to collect them for your new ant farm.
Be Part of
Ask A Biologist
By volunteering, or simply sending us feedback on the site. Scientists, teachers, writers, illustrators, and translators are all important to the program. If you are interested in helping with the website we have a Volunteers page to get the process started.