Soft bristle brush (a small soft-bristled paint brush, item # 6020-0100 from www.gordonbrush.com, or purchase from an art supply store)
Methods
Setting up the boxes to be used for the warm and room temperature environments:
Making sure the lights are not plugged in, unscrew all of the bulbs from the strip of Holiday lights.
Using an angle compass, trace a circle along the inside bottom of the box (the radius should be in the center and extend to the wall of the box)
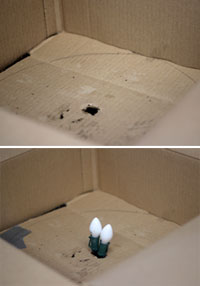
Cut a hole that is large enough to fit two of the holiday light sockets in the center of the circle you have drawn on the bottom of the box.
Insert the two holiday light sockets into the bottom of the box. Screw the bulbs back onto each of the two light sockets that are inside of the box. Make sure no part of the bulb itself is touching any part of the box to prevent all risk of fire.
Repeat these steps for additional warm temperature boxes that may be needed, and lay the boxes side by side so the holiday lights can be strung in a line underneath them. In general, one warm temperature box will be sufficient for each class of students.
For the room temperature box, no manipulation of the box is necessary.
Calibrating the warm environment box:
Place a thermometer in the warm temperature box anywhere along where the circle was drawn.
Close the lid of the box, and plug the lights in. Wait 2 hours, open the box and record the temperature reading. This is the temperature the Manduca will be growing in for the warm temperature environment. This should be near 30°C. If it’s not close to 30°C, add or remove light bulbs as needed.
Creating the artificial diet:
Mix 1 part dry artificial mix into 3 parts of water that has reached a boil in a beaker or other cooking container (directions should be included with the artificial diet).
Stir for 10 minutes while simmering.
Take off of the heat and spread over a large cake pan or cookie sheet. Cover with aluminum foil or plastic wrap and store in the refrigerator.
Setting up the Manduca containers:
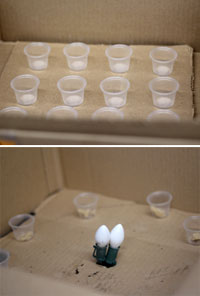
Top: Cool box setup Bottom: Warm box setup
Choose the number of Manduca containers you will need for each class of students. In general, two students can be in charge of the measurements for one Manduca. For an average class of 32 students, you would need 16 containers. Scoop a thumbnail amount of artificial diet into each 1 oz cup that will be used to begin growing the eggs.
Use a soft forceps to place 1 egg in each 1 oz cup on top of the food.
Puncture each lid for the 1 oz cups 2-3 times with a thumbtack to allow for air flow.
Place a lid on each of the1 oz cups.
Use a permanent marker to label half of the cups “cool”, then number each of the cups. Label the other half of the cups “warm”, and number each of the cups.
Place the cups labeled “cool” in the room temperature box. These cups can be placed anywhere in the box because the temperature should be the same throughout the box.
Place the cups labeled “warm” in the box set up for the warm environment. Each cup should be placed along the circle drawn on the bottom of the box, so that each cup is equidistant from the heat source (the two light bulbs in the center).
Turn the lights on in the warm environment box. Make sure to keep these lights on for the remainder of the experiment.
On-going care of the Manduca larva:
When a container looks dirty, remove the insect from the container using a soft forceps, and place them on the lid of the container. Use a paper towel and water to remove all feces and old food from the container. Dry the inside of the container with a paper towel, and scoop in the appropriate amount of food for that size of the cup. Place the insect back into the container with soft forceps, place the lid back onto the container, and place the container back into its appropriate box.
When a Manduca has outgrown its 1 oz container, it is ready to be transferred to a 20 oz cup. Label the cup with a permanent marker so that it matches the label of the original cup. Place a teaspoon of artificial diet into the larger cup, and then transfer the insect using the soft forceps. Make sure that the lid to the 20 oz cup has 4-6 holes punctured in it with a thumbtack to allow for air flow.
By volunteering, or simply sending us feedback on the site. Scientists, teachers, writers, illustrators, and translators are all important to the program. If you are interested in helping with the website we have a Volunteers page to get the process started.